Body Text
PARDOT FORMS:
https://help.salesforce.com/s/articleView?id=sf.pardot_create_form.htm&type=5
https://help.salesforce.com/s/articleView?id=sf.pardot_forms_css_classes.htm&type=5
https://jennamolby.com/pardot-form-css-framework-and-examples/
https://www.salesforceben.com/the-drip/5-resources-for-customizing-pardot-forms/
https://ebq.com/pardot-form-css-stylinghttps://www.w3schools.com/
PIANO:
Located in the Landing Page, BUILD & TEST subtask for Developers to check before approving content.
Developer Live Asset Review Checklist:
Scan 1 – Copy & Image accuracy
Scan 2 – General layout:
All elements are present and positioned as planned in the proof
Sizing & proportions of all elements match proof
Scan 3 – Responsiveness – looks good on all screen sizes
Scan 4 – Details – Correct font styling, drop shadow styles, borders, etc.
When searching for solutions online, use keywords related to the subject you’re looking for. Think about what someone would be likely to name an article about what you’re looking for, and is this a problem lots of other people are likely to have encountered? How might they have worded their questions differently from your search terms?
Use these guidelines to help you refine your search:
https://support.google.com/websearch/answer/2466433?hl=en
Tips to avoid wasting time:
USE THESE STEPS AS A GUIDELINE WHEN APPROACHING UNFAMILIAR UPDATES AND STYLING ON A FORM LAYOUT:


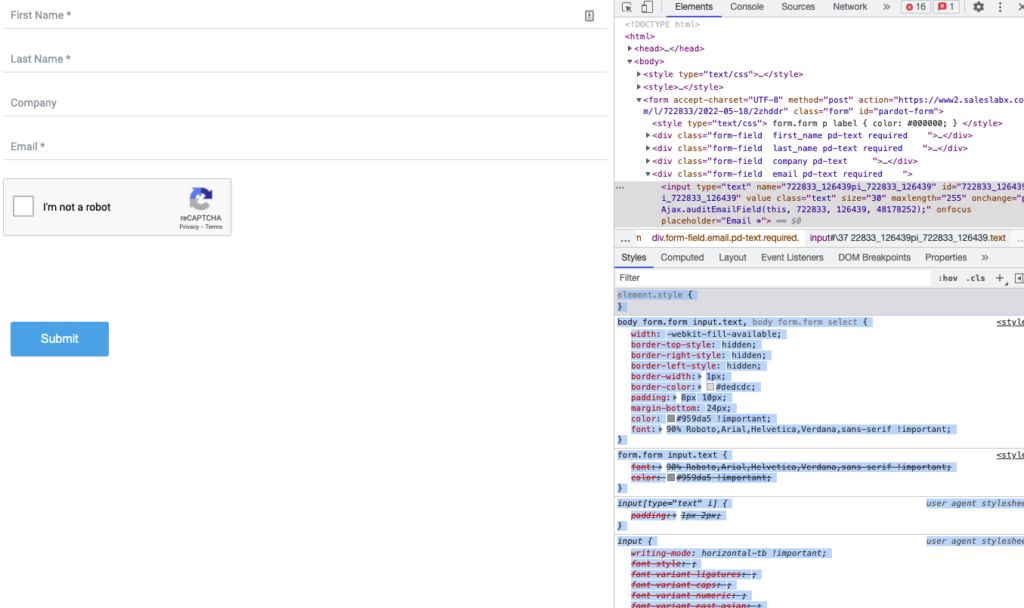

<script>
document.addEventListener("DOMContentLoaded", function () {
    const form = document.getElementById("pardot-form");
    const requiredFields = form.querySelectorAll(".required input");
    const submitButton = form.querySelector('input[type="submit"]');

    function checkRequiredFields() {
        let allFilled = true;
        requiredFields.forEach(field => {
            if (field.value.trim() === "") {
                allFilled = false;
            }
        });
        submitButton.disabled = !allFilled;
    }

    // Disable initially
    checkRequiredFields();

    // Attach listeners
    requiredFields.forEach(field => {
        field.addEventListener("input", checkRequiredFields);
    });
});
</script>
USE THESE STEPS AS A GUIDELINE WHEN APPROACHING UNFAMILIAR UPDATES AND STYLING ON A LANDING PAGE:


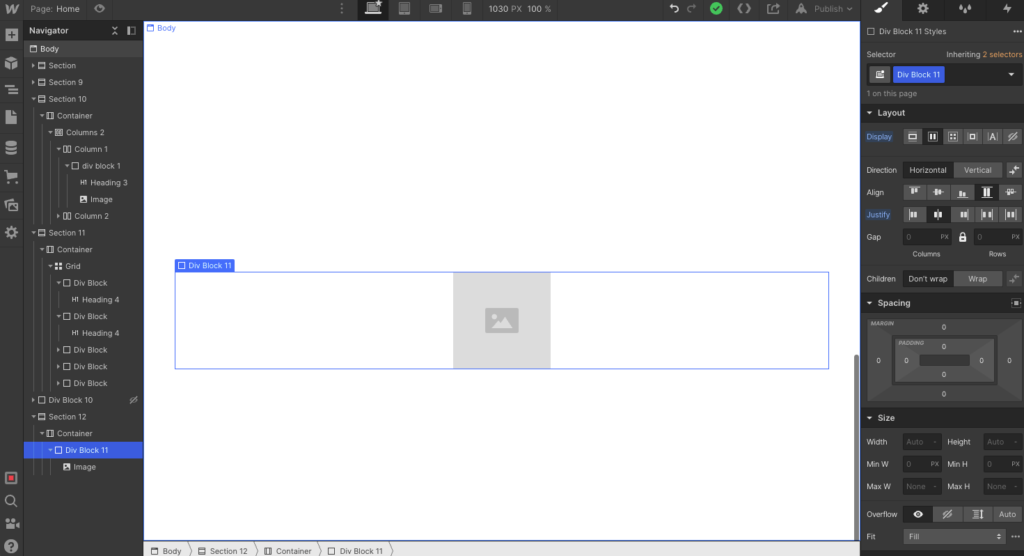
Creating sliders and carousels in Webflow can be a real headache—limited flexibility, clunky UI, and constant workarounds. Instead, try using our Internal tool here: Carousel/Slider Builder. It’s a cleaner, faster way to generate responsive sliders or carousels without the Webflow pain. Here’s how it works:
Switch between “Slider” or “Carousel” mode using the toggle in the top-left.
Customize your layout — control the number of visible columns, total items, autoplay, and arrow positions.
Export and paste the generated HTML/CSS/Javascript directly into your exported HTML file from Webflow.
Then you can edit the carousel cards directly in the HTML.
It’s a massive time-saver and gives you way more control than Webflow’s native options.
<script src="https://clientslx.b-cdn.net/SalesLabX/DynamicIframe/iframe-resizer.js"></script>
// Do not edit this!
<script id="dynamic-iframe" src="https://clientslx.b-cdn.net/SalesLabX/DynamicIframe/dynamicIframe.js"
data-src="https://www2.saleslabx.com/l/722833/2025-09-05/35m97v"></script>
// Make sure to only edit the data-src attribute value!
This will automatically adjust the height of the iframe dynamically, and will work with 2 column forms, conditional fields, and when error messages appear.
Can be links to Webflow University Topics or typed out explanations if no existing article explains it well
Extra email troubleshooting related subjects:
above and below your text/content with the height of the padding you’d like.
Stretchy Non BG Images in Outlook: Check for conflicting width/height parameters on the images’s tag, and on the tag itself.
How to Force Outlook to show fallback fonts:
https://jennamolby.com/how-to-force-outlook-to-display-the-fallback-font-instead-of-times-new-roman/
https://stackoverflow.com/questions/18254711/html-emails-fallback-for-mso-conditional/21626196#21626196
<!–[if !mso]><!–><span style=”font-family: Helvetica;”><!–<![endif]–> TEXT <!–[if !mso]><!–></span><!–<![endif]–>
To disable blue hyperlinks in Emails for Apple, Gmail, and Samsung add this code to CSS:
a[x-apple-data-detectors] {
color: inherit !important;
text-decoration: none !important;
font-size: inherit !important;
font-family: inherit !important;
font-weight: inherit !important;
line-height: inherit !important;
}
u + #body a {
color: inherit !important;
text-decoration: none !important;
font-size: inherit !important;
font-family: inherit !important;
font-weight: inherit !important;
line-height: inherit !important;
}
#MessageViewBody a {
color: inherit !important;
text-decoration: none !important;
font-size: inherit !important;
font-family: inherit !important;
font-weight: inherit !important;
line-height: inherit !important;
}
// immediate parent elements and their attributes
<tr>
<td align=”left” class=”x m” style=”font-size:0;padding-bottom:0;word-break:break-word;”>
<div style=”text-align:left;”><span style=”font-size:16px;font-family:’Open Sans’,’Arial’,sans-serif;font-weight:300;font-style:italic;color:#ffffff;line-height:150%;mso-line-height-alt:24px;”><span class=”gmail-blend-screen”><span class=”keep-white gmail-blend-difference” pardot-region=”” style=”color: #ffffff;”>Assistant Director of Admissions</span></span></span>
</div>
</td>
</tr>
// classes and their styles:
<style>
u + .body .gmail-blend-screen { background:#000; mix-blend-mode:screen; }
u + .body .gmail-blend-difference { background:#000; mix-blend-mode:difference; }
</style>
// mso css portion
<!–[if gte mso 16]>
<style>
.keep-white {
mso-style-textfill-type:gradient;
mso-style-textfill-fill-gradientfill-stoplist:
“0 \#F7FAFD 4 100000 lumm=5000 lumo=95000\,100000 \#FFFFFF 0 100000”;
color:#000000 !important;
}
</style>
<![endif]–>
// place class “body” on body element
<body lang=”en” link=”#DD0000″ vlink=”#DD0000″ class=”SLX body“> …..</body>
// place background color hex code and linear gradient to two most outer div of the module (which hold background image)
<div class=”r e ys” style=”background:#0f2c47 url(‘https://storage.pardot.com/850423/1729865811gczZ5Cbh/Untitled_2.png’) center center / cover no-repeat;background-position:center center;background-repeat:no-repeat;background-size:cover;margin:0px auto;max-width:600px;”>
<div style=”background:#0f2c47; background-image:linear-gradient(#0f2c47,#0f2c47); line-height:0;font-size:0;”> … </div> </div>
In order to create a rounded cornered “stroke” in emails, use a wrapper module and add a border radius + background color + 1px padding on that, and then on the column inside that add a white background color + the same border radius. this will create an “stroke” look that tests well.
Salesforce (SF) Lightning has a stricter HTML sanitizer than Pardot. To ensure email templates render correctly and pass the Lightning security validator, follow these structural and syntax updates.
Lightning identifies XML namespaces and custom Pardot attributes as invalid.
Action: Clean the <html> tag.
Remove: xmlns, xmlns:v, xmlns:o.
Remove: Proprietary Pardot attributes such as pardot-repeatable, pardot-region, and pardot-region-type.
Salesforce Lightning uses a different syntax for variable injection.
Syntax Change: Replace {{Field_Name}} with {{{Recipient.Field_Name}}}.
Note: Use triple curly braces { { { } } } for standard fields to ensure HTML characters or links within those fields are rendered correctly.
Lightning often strips complex <style> blocks in the <head>. Rely more on inline styles and standard table attributes.
Ghost Tables: Remove complex [if mso] conditional wrappers that use div classes. Instead, use a simple outer table with a fixed width (e.g., width="600") and align="center".
Attribute Placement: Move attributes like valign and bgcolor directly into the <td> or <table> tags rather than relying solely on external CSS classes.
Image Handling: Ensure all <img> tags have explicit width attributes and display:block; inline styles to prevent unwanted gaps in Outlook and Gmail.
Use the table below as a checklist before importing code into the Lightning Email Builder:
| Element | Pardot / Usual Code | SF Lightning Requirement |
| HTML Tag | Contains xmlns namespaces | Plain <html> or <html lang="en"> |
| Merge Fields | {{Recipient.FirstName}} | {{{Recipient.FirstName}}} |
| Regions | pardot-region="header" | Remove attribute entirely |
| Body Styling | Complex CSS in <head> | Simplified CSS + Inline styles |
| Links | Standard <a href="..."> | Ensure merge fields in links use {{{ }}} |
To Add a Custom Field in Pardot
Main Menu > Admin > Configure Fields > Prospect Fields
Click Add Custom Field (top right)
Name the Field, Specify Salesforce field name (can leave blank if you aren’t instructed to match with salesforce), sync behavior, Type, Values… Click Create Custom Field
Now you can create a form, and add this as a field
Difference between Pardot forms and form handlers: https://help.salesforce.com/articleView?id=pardot_forms_versus_form_handlers.htm&type=5
The outermost containing element controls a form’s styling.
If a form is by itself, the layout template for that form is used.
The contents of the form tab is inserted into the %%content%% tag of your layout template.
If a form is on a landing page, the landing page layout template is used, and the form’s layout template is ignored. To make sure the form styling gets used, copy the code from the “layout” tab of the form layout template, and insert that into the “form” tab of the landing page layout template. Remove redundant %%content%%.
– You can change your form’s styling by editing the code in your layout template. If your form is on a Pardot landing page, add the code to the landing page’s layout template.
“Load Default Data” when configuring fields ensures the correct field type (eg. text, dropdown, checkbox etc.) is selected, and it will also pull in the options for dropdowns, checkboxes, radio buttons.
How to have labels display as placeholder text (ala Ossur) https://jennamolby.com/how-to-add-placeholder-text-within-pardot-forms/?source=advanced-pardot-js
Default Form Styling Classes: https://www.pardot.com/blog/default-form-styling-classes/
To make the form height dynamic: https://jennamolby.com/how-to-embed-a-pardot-form-on-your-website-the-right-way/ (possibly still not working?)
CSS MODS: https://ebq.com/making-a-custom-pardot-form-with-css/
Two Column Forms: https://jennamolby.com/the-best-way-to-create-a-2-column-pardot-form/
Making Two Column Forms mobile responsive; https://www.w3schools.com/css/css_rwd_mediaqueries.asp
To open a redirect page in a new window use this script in the thank you code:
<script>
window.open(“Redirect url…”);
</script>
What to update in an email’s HTML to reduce chances of spam triggers
<TITLE> tag:
Update the <title> tag with text. (Title is what populates the browser tab when an email is viewed online)

HTML Errors:
You can see if there are any basic html errors in the code with DW. Click on the red X to view the errors, then fix until the code is clean. Once fixed a green check will appear instead of the red X.


No Empty Attributes:
Populate any empty Attributes. Always have an alt attribute on images


If an attribute is not needed, then just delete it.


WordPress Offboarding Documentation
1. Backup the Client’s Websit
This can be achieved on WordPress Engine by following this set of instructions https://wpengine.com/support/restore/#Download_a_Backup.

2. Migrate the Website to the Client’s Server (Milton and/or the client’s team has handled this step in the process in most cases.)
3. Transfer the Elementor Account
4. Transfer Paid Plugins
5. Document Notable Custom Code
6. Final Review and Handover
Reference Task
push a new website into production
When a development site is ready to be pushed over and override the existing live site, please follow these steps
1. Confirm with the AC/PC that all existing pages/blogs in the live environment, are created and existing in the dev environment.
2. Log into the client’s WPEngine account, and create a manual backup for both the dev and the live environments.
3. update all plugins, themes, and WordPress version on the dev and live WordPress environments. Run a regular maintenance procedure, to ensure all updates been made, and the site is functioning correctly.
4. Create another manual backup for both the dev and the live environments (to have the latest backup include any updates made to the plugins, themes, etc…).
5. When ready to do the push, go to the dev environment and at the top right, click on the “Quick actions” dropdown. Choose “Copy environment”.

6. Within the Copy environment screen, make sure the source environment is set to the Dev environment, and the destination is set to production environment

7. Next, make sure to enable the “All database tables and file system” under the “Include” radio buttons field.

8. Under “Send notifications”, enter your SLX email address so you get a notification to your email when the process is complete.

9. In the “Review & confirm” page, make sure that everything seems to be set up in the way you set it up. Once ready, click the “Looks good, copy the environment” button, and the process of pushing the Development site into the live site will begin.


10. After the process is complete, go to the live site and browse it to make sure everything carried over correctly. Check the WordPress environment to make sure all plugins, themes, etc… are up-to-date.
SLX WordPress Site – Scroll & Layout Fix Documentation
The SalesLabX WordPress site (built with Elementor + Bridge theme) was experiencing persistent double scrollbars, and inner container scrolling.
Objective
The following CSS was added to resolve the scroll issues globally across the site:
/* === Scroll & Layout Fix: Elementor + Bridge Theme === */
html {
overflow-x: hidden;
overflow-y: scroll !important;
height: auto !important;
scroll-behavior: auto;
width: 100%;
}
body {
overflow-x: hidden;
overflow-y: visible !important;
height: auto !important;
position: relative !important;
}
/* Stretched sections should stay within viewport */
.elementor-section.elementor-section-stretched {
width: 100% !important;
max-width: 100vw !important;
left: 0 !important;
right: 0 !important;
position: relative !important;
overflow-x: hidden !important;
}
/* Prevent all container elements from becoming scrollable */
.elementor-section,
.elementor-container,
.elementor-column,
.elementor-inner-section,
.elementor-widget-wrap,
.elementor-widget-container {
height: auto !important;
max-height: none !important;
overflow: visible !important;
box-sizing: border-box !important;
}
/* Fix known problematic column */
.elementor-element-27866248 {
height: auto !important;
overflow: visible !important;
max-height: none !important;
}
/* Clamp overflowing dropdown nav menu */
.elementor-nav-menu–dropdown.elementor-nav-menu__container {
width: 100% !important;
max-width: 100vw !important;
left: 0 !important;
right: 0 !important;
overflow: visible !important;
position: absolute !important;
box-sizing: border-box !important;
padding: 0 16px;
}
/* Wrap long text inside nav menu items */
.elementor-nav-menu–dropdown .elementor-item {
white-space: normal;
max-width: 100%;
overflow-wrap: break-word;
text-align: left;
}
/* Prevent invisible screen-reader spans from causing scroll */
.elementor-screen-only,
.elementor-screen-only span,
.elementor-screen-only * {
display: none !important;
height: auto !important;
max-height: none !important;
overflow: visible !important;
position: static !important;
}
/* Cleanup persistent body dialog styles */
body.dialog-body,
body.dialog-lightbox-body,
body.dialog-container,
body.dialog-lightbox-container {
overflow: visible !important;
height: auto !important;
position: static !important;
}
/* GPU optimization for animation-heavy widgets */
.envato-kit-66-featured-slider .elementor-slides .slick-prev,
.envato-kit-66-featured-slider .elementor-slides .slick-next,
.envato-kit-140-slide .elementor-slide-content,
.envato-kit-140-carousel .slick-active:not(.slick-current) img {
will-change: transform;
}
/* Just one declaration needed */
.envato-block__preview {
overflow: visible !important;
}
The global fix above caused layout compression on the homepage, especially with vertically stretched content.
/* Fix vertical height and alignment issue in homepage hero */
.elementor-7 .elementor-element.elementor-element-1aecf809 > .elementor-container {
height: 70vh !important;
align-items: center;
}
How to create nested lists with sub items: https://www.w3schools.com/html/tryit.asp?filename=tryhtml_lists_nested
GENERAL:
Prettier Bulleted Lists with second line hanging indent:
Add to custom CSS:
ul {
list-style-position: inherit;
padding-left: 40px;
padding-right: 40px;
}
Nested Lists with sub items: https://www.w3schools.com/html/tryit.asp?filename=tryhtml_lists_nested
Prevent line break: add “white-space: nowrap;” in style of element
<span style=”white-space: nowrap;”>EXAMPLE TEXT</span>
Mailto Link Generator: https://mailtolink.me/
Add to calendar buttons: https://saleslabx.com/pardot-add-to-calendar-link/
Anchor links: find ID of element/section, and add “/#id-name” to the end of the url
Pass Thru URLs: To pre fill form add “/?field_name=prefilleddata” to the end of the form url in iframe code
WORDPRESS SPECIFIC:
WP Password Protection:
Using Password Protection
Guide to WordPress Password Protected Pages and Cookie Detection
WP Redirects: Tools > Redirect > Source URL = Old Page & Other URL = New URL
Available Elementor Add Ons: https://elementor.com/addons/
EMAIL SPECIFIC:
Look up someone’s email client: http://mxlookup.online-domain-tools.com/
Prevent line break: add “white-space: nowrap;” in style of element
EXAMPLE TEXT
Rounded Corners (Even in Trouble Outlooks) https://medium.com/@alexvargash/html-email-rounded-corners-2d58c42e491c
Forwarding breaking code: https://litmus.com/blog/when-forwarded-emails-break
Stretchy Outlook BG Images:
If your Outlook Desktop background images are stretching, the problem may be caused by the email client ignoring padding for the module, so the workaround is to take off the top and bottom padding and instead add a blank
above and below your text/content with the height of the padding you’d like. Check to see if there’s already an empty spacer
above/below the content and if there is you can just increase the height.
Force Outlook to show fallback fonts:
Quick Tip: How to Force Outlook to Display The Fallback Font Instead of Times New Roman
TEXT
Links in Emails Best Practices: Just so you’re aware, emails with more than five hyperlinks in them (including company homepage and social links) are more prone to being marked as spam. Our best practices would dictate breaking email content into multiple shorter emails, or placing the collection of links on a landing page the email CTA could link to. You could also continue to use lots of links but actively remind people to mark you as a safe sender if you’d rather not compromise on the email content. We’ll do whatever you prefer, just want to make sure you have all the info you need to decide.
Darkmode Invisible Text Workaround: lighten your bg, either in PS or AI and test multiple lighter versions until you get to a place where the darkmode is working correctly but the normal text is still readable
Darkmode isn’t very customizable: https://www.litmus.com/blog/the-ultimate-guide-to-dark-mode-for-email-marketers/
Disable Blue Links in Emails:
For Apple, Gmail, and Samsung add to CSS:
a[x-apple-data-detectors] {
color: inherit !important;
text-decoration: none !important;
font-size: inherit !important;
font-family: inherit !important;
font-weight: inherit !important;
line-height: inherit !important;
}
u + #body a {
color: inherit !important;
text-decoration: none !important;
font-size: inherit !important;
font-family: inherit !important;
font-weight: inherit !important;
line-height: inherit !important;
}
#MessageViewBody a {
color: inherit !important;
text-decoration: none !important;
font-size: inherit !important;
font-family: inherit !important;
font-weight: inherit !important;
line-height: inherit !important;
}
Add to calendar buttons: https://saleslabx.com/pardot-add-to-calendar-link/
Nested Lists with sub items: https://www.w3schools.com/html/tryit.asp?filename=tryhtml_lists_nested
Pass Thru URLs
To pre fill form: add “/?field_name=prefilleddata” to the end of the form url in iframe code
Elementor Add Ons: https://elementor.com/addons/
WP Redirects:
Tools > Redirect > Source URL = Old Page & Other URL = New URL
WP Password Protection:
https://wordpress.org/support/article/using-password-protection/
Disable Blue Links in Emails – For Apple, Gmail, and Samsung add to CSS:
a[x-apple-data-detectors] {
color: inherit !important;
text-decoration: none !important;
font-size: inherit !important;
font-family: inherit !important;
font-weight: inherit !important;
line-height: inherit !important;
}
u + #body a {
color: inherit !important;
text-decoration: none !important;
font-size: inherit !important;
font-family: inherit !important;
font-weight: inherit !important;
line-height: inherit !important;
}
#MessageViewBody a {
color: inherit !important;
text-decoration: none !important;
font-size: inherit !important;
font-family: inherit !important;
font-weight: inherit !important;
line-height: inherit !important;
}
ROUNDED CHECKBOX FORM
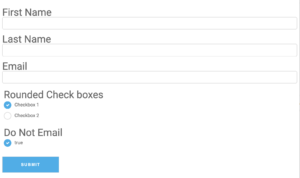
View Online:
https://www2.saleslabx.com/l/722833/2020-08-04/tgk3h
ICON FIELDS FORM

View Online:
https://www2.saleslabx.com/l/722833/2020-08-14/v135h