SLX Lattice Guide for All Team

TABLE OF CONTENTS

About

This process guide is intended to provide all SLX team members with information, instructions, and helpful resources regarding Lattice – our people and performance management platform.

Introduction to Lattice

What is Lattice?

Lattice is an engagement and performance management platform. It helps our team organize, track, and gain visibility into our individual and collective progress, goals, and growth.

Visit the Lattice Help Center or read their Getting Started Guide for Employees to learn more about the platform in general.

Why Lattice and how does it help us?

Lattice benefits our team in several ways. The platform helps:

  • Organize individual and team communication, feedback, and goals in a single place 
  • Give us visibility and transparency into SLX’s growth paths
  • Give us visibility and transparency into personal career growth paths
  • Connect individual goals and actions to organizational impact
  • Promote our values
  • Provide a space for individual and collective development tracking

Activating your Lattice account

All team members will receive an email from Lattice with the subject line “Your Lattice invite has arrived!” (see screenshot below). 

To activate your account:

  1. Click on the “Join team” button. This will take you to a ‘Create your account’ registration page. Fill in your basic details.
  2. At the bottom of the registration page, under ‘Set new password’,  do not enter a password here. Instead, click on the ‘’Sign in with Google” option and enter your @saleslabx.com Gmail account details (see screenshot below).
  3. Feel free to browse the platform once you are logged in! Go ahead an add your profile pic as well. 

If you did not receive this email or have trouble setting up your Lattice account, please contact hr@saleslabx.com.

Lattice Home Page

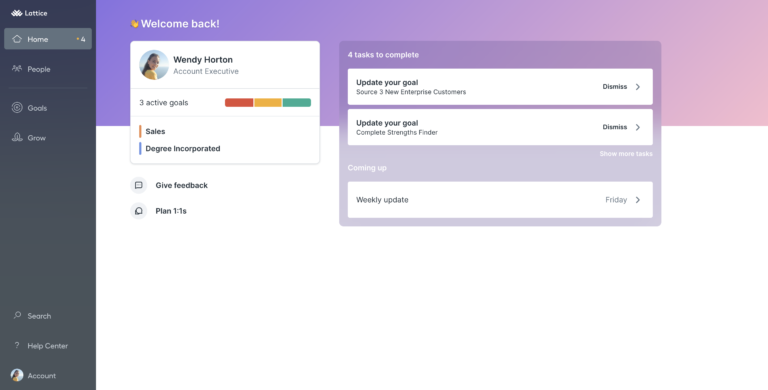
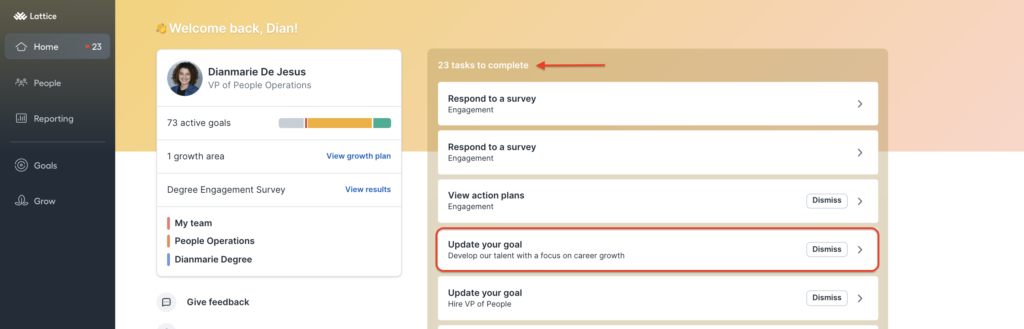
When you first sign into Lattice, you’ll be greeted by your Home Page (see screenshot below). The Home Page provides a quick snapshot of updates, action items, or upcoming meetings.

From this page, team members can:

  • Find a summary of active goals
  • Give or request feedback
  • Plan 1:1s
  • Keep up with tasks and upcoming sessions or review cycles

People Page

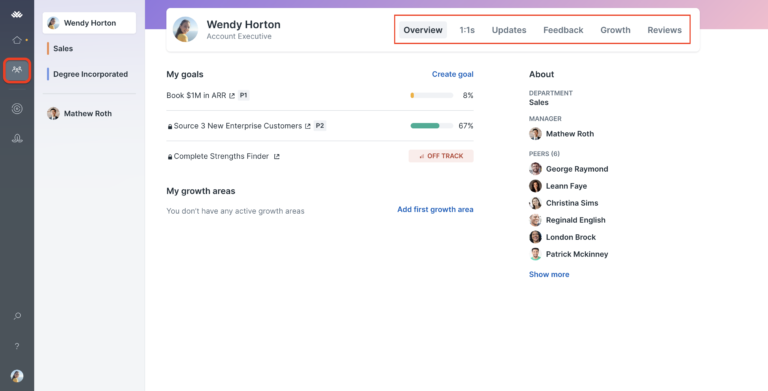
The People page gives team members visibility into Updates, 1:1s, Goals, and Reviews in the context of their work relationships (see screenshot below) For example, team members can find organization goals, their department, org chart, and profile within the personalized page.

The toolbar on the top right (see below) provides quick and easy access to the Lattice tools.  

Goal Explorer Page

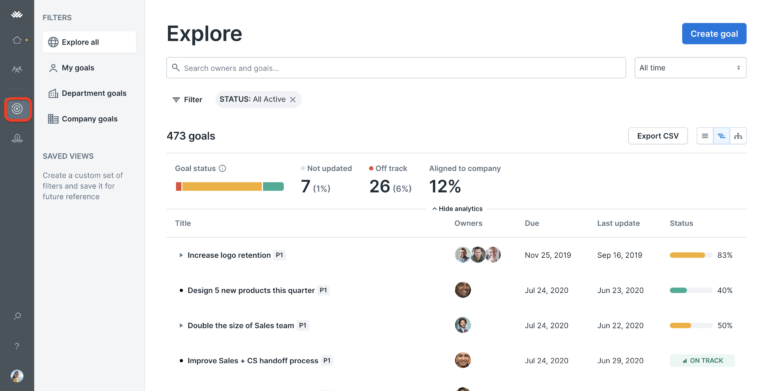
This is where you can view, edit, and update your personal goals, as well as see any available public goals and their progress. It offers several visualizations that depict the structure between individual goals and key results and the relationship between cascading goals

From this page, team members can:

  • View any public department and organization goals
  • View your own goals
  • Create saved views for goals
 

Grow Page

You will also see the Grow page (lotus flower icon), which will hold your career growth paths (tracks). This is currently in the works, so you don’t have to worry about using it for Q1 2022. We will be sharing more details when this tool becomes available.

General

The left-hand discovery navigation panel provides you with additional resources you may need to be successful in Lattice, including:

  • Easy to use search functionality to find tools and features they need
  • Link to the Lattice Help Center and Lattice University, where you can find additional how-to guides and tips
  • Your individual account settings

360 Performance Review Cycle Tool and Guide

360 Performance Review

What is the 360 Performance Review Cycle?

The 360 Performance Review is a process that evaluates all angles of each team member’s performance. It provides us with actionable feedback and gives all team members a better understanding of their contributions to their team and SLX. It helps us identify future areas of growth and development and encourages us to celebrate current strengths and wins. The 360 Review consists of four separate review types, which are completed through forms in Lattice, with performance-related questions:

  • Self Reviews: You evaluate your own performance during the evaluation period. This will happen during the first week of our Review Cycle.
  • Upward Reviews: You evaluate your direct lead’s performance during the evaluation period. This happens during the second week of our Review Cycle, at the same time as Peer Reviews.
  • Peer Reviews: You evaluate your peers’ performance during the evaluation period. You will be assigned three peers to evaluate. This happens during the second week of our Review Cycle, at the same time as Upward Reviews.
  • Downward Reviews: If you’re a team lead, you evaluate your direct report’s performance during the evaluation period. This happens during the third week of our Review Cycle.

How to Prepare and Participate in the 360 Review Cycle 

On the first day of the Review Cycle, you will receive a reminder email from Lattice to begin your reviews. Follow the instructions in the email to get started! You can also login to Lattice directly – on your home page, you will be able to see your to-dos and reminders related to the review cycle.

Note: You will notice that all forms are available to you at the same time. While you are welcome to complete all forms within the same week, we suggest following the recommended review form submission timeframe below. The timeframe was built intentionally to give you enough time to complete each form, and be thoughtful about your observations and feedback. 

Review the timeline and to-dos below:

  1. Week 1:
    • All team: Focus on completing the Self Review evaluation form.
    • Team leads: Together with your Department Lead, schedule Performance Review Meetings with your direct team members on Week 3.
  2. Week 2:
    • All team: You will receive a reminder email from your People Ops team to begin completing your Upward and Peer Review forms. Focus on completing the these.
  3. Week 3:
    • Team leads: You will receive a reminder email from your People Ops team to begin completing your Downward Review evaluation forms. Focus on completing these. Also, prepare notes to meet with your direct leads during your scheduled Performance Evaluation meetings.
    • All team: Get ready to meet with your team lead. Preparing discussion notes is not necessary (though encouraged), but do come prepared to discuss your self-evaluation. Your team lead will be talking to you about your self-evaluation, their evaluation of you, and your peers’ evaluations of you. During this session, you will set goals with your team lead (they may have goals for you in mind as well) to accomplish before the next review cycle.
  4. Week 4:
    • All team: The review cycle is complete and you will receive a copy of your review packet from Lattice via email after your performance review meeting with your direct lead.
Performance Review Tips and Best Practices:
 
  • Dedicate time to complete each form: Create focus time blocks in your calendar for each review form you need to complete and stick to the recommended timeline above. Each form should indicate the estimated completion time (give yourself a few more minutes than that since it’s the first review cycle). Turn off chat notifications and remove other distractions during this time.
  • Take your time: Do not rush. Be thorough and thoughtful in your responses. Read through the form description and all questions carefully. Remember to use Everhour to track this time.
  • Be honest, respectful (towards others), and constructive: You can still provide honest, helpful feedback to help someone grow/improve without being a meanie pants. State your feedback in a way that shows you care about the participant’s growth and development. Don’t forget to also provide positive feedback/the things you appreciate about them. The 360-degree feedback process will only be valuable to a recipient if the feedback received is open, direct, and respectful.
  • Speak for yourself: Everyone has the opportunity to share feedback – so focus on sharing ratings and comments based on your personal feedback and experience.
  • Focus on the question: Base your ratings and comments on the question that is being asked. This isn’t the space to make comments on other topics, such as benefits and compensation. 
  • Be specific when answering questions: Don’t just tell someone they are a “poor/great team member”. Provide specific examples and actionable to-dos. If providing improvement feedback, what is it about the person that they may need to work on? If providing praise feedback, what specifically makes them a great team member? Maybe even tie in an SLX value! This applies to yourself when completing your Self Evaluation form. Be specific and provide examples when possible. 
 

360 Performance Review Cycle Annual Schedule:

  • Q1 (January): 360 Review (Self, Upward, Peer, Downward)
  • Q2: (April): Upward and Downward only
  • Q3 (July): 360 Review (Self, Upward, Peer, Downward)
  • Q4 (October): Upward and Downward only

360 Performance Review Cycle Annual Schedule:

  • 360 Performance Review Cycles (Self, Upward, Peer, & Downward) will happen approximately every six months, following the end of each KPI assessment period.

1:1 Tool and Guide

What are 1:1s and why do we have them?

These are dedicated monthly sessions between a Team Member and their Direct Lead to connect and communicate. They:

  • Provide a time and space for discussing projects, removing blockers, answering questions, setting goals, and getting/receiving feedback.
  • Are not a performance review, but rather, more of a check-in. Performance Reviews are a space to evaluate a team member’s performance over a set period of time (the review cycle). Refer to the 360 Performance Review section for more information.

Lattice's 1:1 Tool

The 1:1 tool allows team members and team leads to collaborate on a shared agenda for the sessions. With this tool, team members can:

  1. Set up recurring and ad-hoc (one-time) 1:1 sessions.
  2. Create 1:1 agendas and talking points.
  3. View past 1:1 sessions and agendas.
  4. Connect Google calendar events to Lattice to always have insight into when the next 1:1 is (even if the time changes).
 

At SLX, team leads have already pre-scheduled these monthly sessions in Lattice, so team members will not have to set up recurring 1:1s. 

Ad-hoc (one-time) 1:1s can also be scheduled by team members as needed, outside the monthly sessions.

Let’s dive into the different features of the 1:1 tool below. 

View an Upcoming 1:1
 
  • Login to Lattice: If your 1:1 is approaching soon, you’ll see a reminder on your home page. You can also click on the People icon on the left navigation bar –> select ‘My Profile’ –> ‘1:1s’ on the top right (see screenshot below).
  • Email Reminder: You will also receive an email reminder from Lattice 2 hours before your scheduled 1:1. From this email, you can click to view and edit the 1:1 agenda (talking points).

Edit the 1:1 Agenda and Add Talking Points

  • All 1:1s will have an agenda: The week of the 1:1, both team members and team leads can add agenda items (talking points) to the session ahead of time. During the session, discussion notes and action items can be documented as well.
  • Agenda Items:
    • Standard talking points: Our 1:1 agenda in Lattice comes with some standard, suggested talking points that will always appear each month. You can easily tell which these are as they have a building icon next to them (see screenshot below).
    • Custom talking points: You and your team lead can choose to ignore the standard talking points and add your own before your 1:1. Here’s how:
      1. Enter your upcoming 1:1 page.
      2. Under Agenda, click into ‘Add talking point’, add your item, and click the ‘Add’ button. You must click the ‘Add’ button to save your item.
    • Suggested talking points: What’s cool is that Lattice also provides suggested talking points if you so happen to be in need of some inspiration. To add a recommended talking point:
      1. From your 1:1 agenda in Lattice, scroll down to the “Recommended for you” section. Here, you will see different categories/topics such as ‘Career Growth’, ‘Collaboration and Teamwork’, ‘Engagement and Morale’, ‘Feedback’, and ‘Productivity’.
      2. Click on the ‘shuffle’ button to browse through recommendations. Once you find a talking point you’d like to add, click ‘Add to agenda’ (see screenshot below).

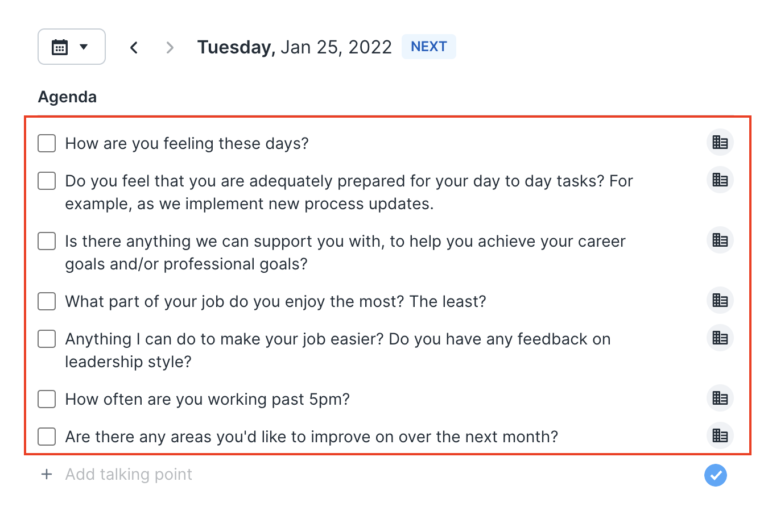
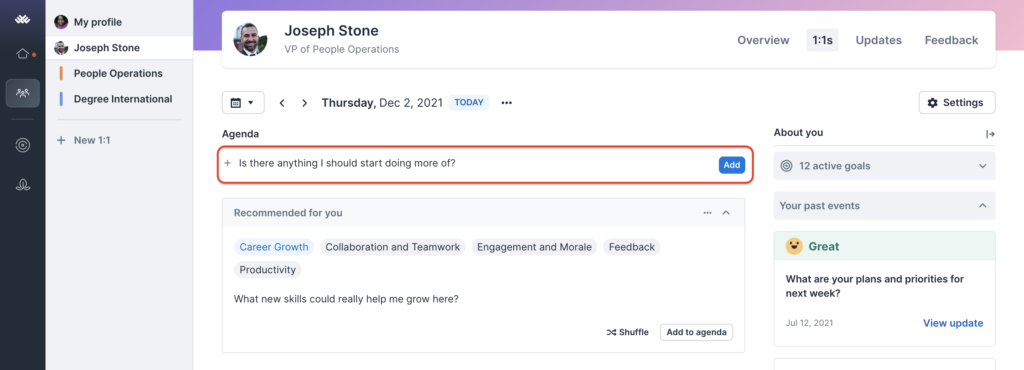
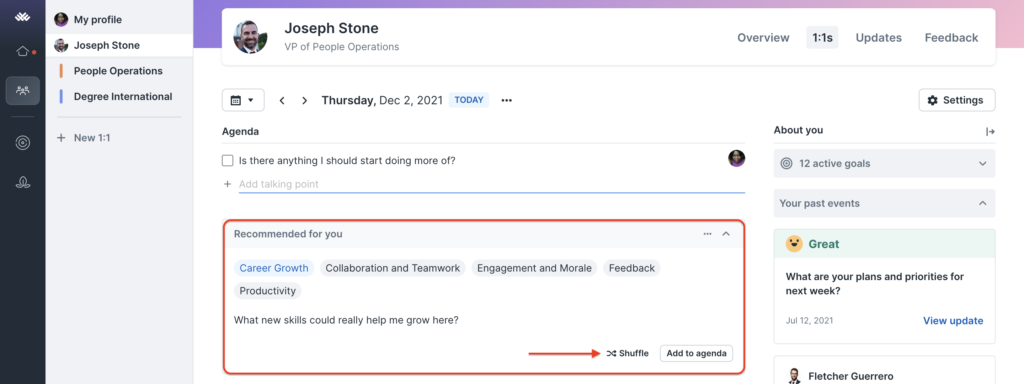
3. Your talking point will appear under the ‘Agenda’ with your image next to it. This helps your lead know that you added this item.

Learn more about navigating 1:1 agendas as a team member here.

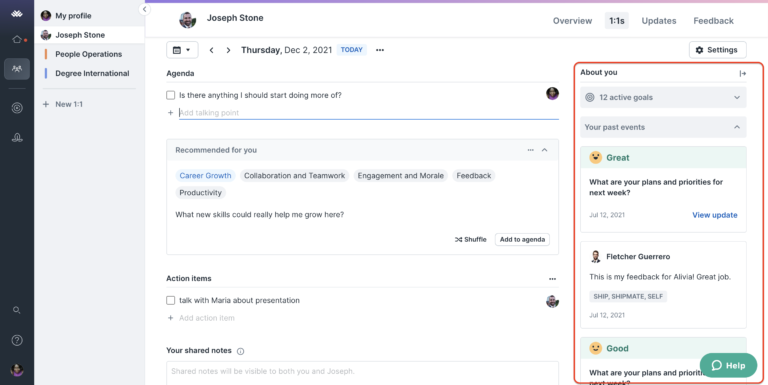
Navigating the 1:1 Context Panel

When you enter a 1:1, you will also see a context panel on the right-hand side of the screen. Here, you will be able to view your active growth areas (coming soon), current goals, and past events:

  • Active growth areas (not applicable yet – coming soon).
  • Active goals: This section lists the goals you are an owner of. Selecting a goal will take you to the goal’s details page for you to view it or provide a progress update.
  • Past events: Past events included any notes to self you have submitted, your past feedback you’ve given/received, past updates, and goal updates.


This activity is also viewable from your team lead’s end. Note: It will not be visible for 1:1s between non-team lead participants.

Preparing for Your Upcoming 1:1 (Checklist)

Two hours before your 1:1, you will receive an email reminder from Lattice. To best prepare for your monthly session, follow the steps below:

  1. Locate your 1:1 Session in Lattice: See “View an Upcoming 1:1” section above on how to do this.
  2. Review Agenda and Add Talking Points: Once in your 1:1 page, review the Agenda (talking points), which may include standard 1:1 talking points and specific talking points that your direct lead has already added. You can also add your own talking points to the agenda (what you want to discuss with your lead during your 1:1) or use suggested talking points. See ‘Edit the 1:1 Agenda and Add Talking Points’ section above on how to do this.
  3. Review Last Month’s Goals: Review and update last month’s goals (if this is your first 1:1 or first time using Lattice, this does not apply to you). To do this:
    • When you enter your 1:1, you will also see a context panel on the right-hand side of the screen. Here, you will be able to view your active goals. Click on each active goal to provide an update.

During Your 1:1

Best practices and what you can expect to happen during your 1:1:

  1. Arrive on time: Be respectful of your lead’s time and arrive on time so that you can start and end on time.
  2. Communicate and connect with your lead: Use your agenda as a guide for your conversation. Be honest and transparent with your lead – they are there to listen and help you! You can check off, comment, and add additional talking points during the session. You can also make private notes for yourself that your team lead will not be able to see.
  3. Discuss last month’s 1:1 goals with your lead and provide a progress update: If you are both satisfied that the goals have been met, you will close them out. If you need additional time to complete the goal, discuss with your team lead about extending the goal deadline.
  4. Set new goals for the month: You will be discussing new goals (deliverables) with your lead during your 1:1. Goals set should help you grow and develop. Bear in mind that most 1:1 goals should be achievable by the next 1:1 session. If you’re setting long term goals, make sure that you have mini goals (key results) that you can accomplish by the next 1:1 to help you move towards your larger goal.

After Your 1:1 Session

After the session ends:

  1. Your team lead will: Create new goals in Lattice that were set during your 1:1. You will be notified via email that these have been created.
  2. You should: Update your goals throughout the month, and before the next 1:1 session. 
  3. You can always refer back and view a completed 1:1 by selecting the calendar icon and choosing a past 1:1 date from the dropdown (see screenshot below).

Scheduling An Ad-hoc (One-Time) 1:1 and Linking it to your Google Calendar

While your monthly 1:1s with your team leads have already been scheduled, you can always request a 1:1 meeting with a team lead or other team member at any time. These are considered ad-hoc 1:1s and are one-time session/do not have a repeated schedule. 

In creating a 1:1 session in Lattice, you will also need to connect the event to your scheduled call in Google Calendar. This is an important step as any date/time changes made to scheduled sessions in Google Calendar will automatically sync and update the Lattice event. Note: Simply creating a 1:1 meeting in Lattice will not create a new event invite in Google Calendar.

Let’s walk through the steps on how to schedule an ad-hoc 1:1 and link it to your Google Calendar:


Connect an existing calendar event

To do this, you will need to first create the event in Google Calendar:

  1. Open Google Calendar. Create an event on the date/time you want to schedule the 1:1 session. Be sure to check the person’s availability to meet first by reviewing their calendar.
  2. Name the event [Your Name + Their Name 1:1]. 
  3. Be sure to invite the team member to the calendar invite and make sure a Google Hang Link is available. 
  4. Then move on to scheduling it in Lattice by following the steps below.
 
Review this quick Loom video on how to create the event in Google Calendar. You can also read more here on Lattice’s own guide.


Schedule an Ad-Hoc (one-time) 1:1 Session in Lattice

  1. Login to Lattice
  2. Click on the “People” icon from the Navigation Bar on the left and select “+ New 1:1”.
  3. “Set up 1:1 relationship”: This pop-up box will appear. Begin typing the name of the team member you want to meet with and select their name once it appears.
1:1 person

     4. Click on ‘Connect an existing calendar event’ and follow the additional steps below:

    • If this is your first time connecting your Google Calendar, you will be prompted to choose your calendar provider (Google Calendar).
    • Select the calendar that has the 1:1 event you just created (this should usually be on your SalesLabX Gmail calendar) –> click ‘Select calendar’. This will pre-populate the box with upcoming events that involve you and the team member you’re trying to meet with. 
shan calendar
    • Select the matching calendar event titled [Your Name + Their Name 1:1] –> click ‘Select event’. This will link the event in Google calendar and the event in Lattice and should populate the meeting date, time, and time zone. If you move the time/date in your Google calendar, it will automatically update the 1:1 details in Lattice.

      5. ‘Frequency’: Select ‘Once (not recurring)’

      6. ‘Default agenda template’: You can either select an existing template or just create a new one.

      7. ‘Talking points from previous meeting’ and ‘Action items’: Toggle these off unless you want to bring in any previous talking points/action items.

      8. Click ‘Save’: The person you have scheduled a 1:1 with will receive a notification email with the link to the 1:1 page so that they can add talking points prior to the session, if applicable.

How to View Past 1:1s

You can view past 1:1 agendas by selecting the calendar icon and choosing a date from the dropdown.

Goals Overview

What are goals and how do they help us?

Goals inform us on what’s important to achieve and help us map out a plan to get to our desired results. They help us work towards our personal and career growth with clear measurable objectives, ideally achieving success. When effective goals are created, they help us:

  • Communicate and inform us what to focus on.
  • Find purpose and meaning in our work.
  • Define milestones to reach our individual and collective growth.
  • Provide a clear view of our progress.
  • Understand how individual, departmental, organizational goals are connected (and how we as individuals make an impact!)
  • Motivate us to do our best and achieve success.
  • Inform next steps when achieved and allow us to plan for future success.
 

Setting goals (large and small) also gives your leadership team clear visibility into your performance and career growth path, which helps them assess potential promotions, bonuses, and leadership opportunities.

Setting Goals

Goals will be created during your 1:1s with your direct lead, as well as after each Performance Review Cycle. You’ll work together with your direct leads to define goals for yourself, and your direct lead will set specific goals they have in mind for you as well.

However, this doesn’t mean that you can’t set goals outside your 1:1s and Performance Review cycles! If you have a goal in mind for yourself or your team, talk to your team lead about it. We want to hear your aspirations!

Goals Tool In Lattice

Goal Structure in Lattice

The goal structure in Lattice allows us to track and measure our progress at all levels (individual, team, department, and organization. This means that goals created are made up of two significant parts: Objectives and Key Results. 

Objectives: These help set the direction for the entire organization, department, team, or individual, and are usually aspirational. It is something that we want to achieve that is not measured.

Objective examples:

    1. Build a world-class team
    2. Increase organization revenue
    3. Improve overall efficiency


Key Results: These are quantitative (#, $, %, binary) and help measure what you need to accomplish in order to achieve your objective. They are metrics-driven and tangible.

Key result examples for an objective:

Objective: Build a world-class team


    1. Key Result 1: Hire 3 inside Account Representatives
    2. Key Result 2: Increase team member retention to 95%
    3. Key Result 3: Train all (100%) team leads to be result driven
 

Together, this goal structure is what is known as an OKR (Objective Key Result).

Creating Goals in Lattice (Team Leads Only)

To create a goal in Lattice at SLX, we will use the OKR structure, meaning that you will be creating Objectives and Key Results. We start with creating objectives, and later assign key results to achieve that objective.

Objectives

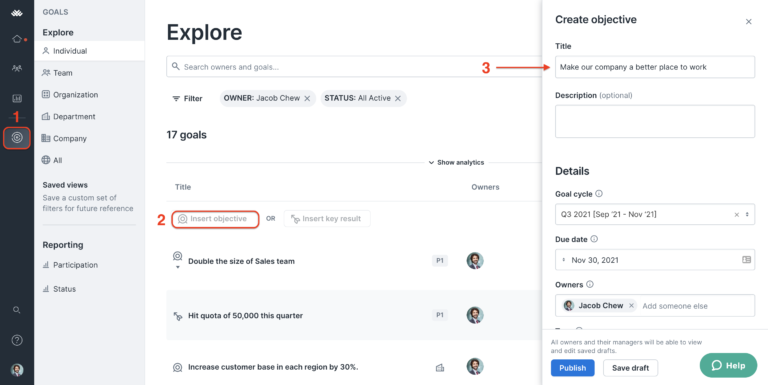
There are two ways we can create objectives in Lattice:

  1. Navigate to the Lattice Home page, and select the “Create goal” button on the lower left of your dashboard,

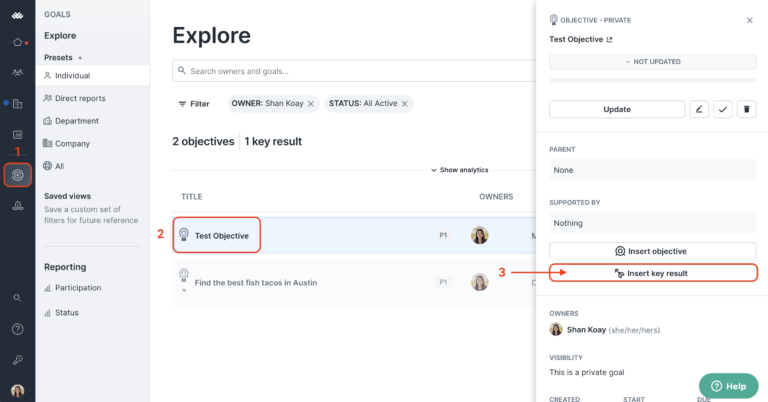
2. Or, navigate to the Goal explorer page and select “Insert objective”

  1. Then, follow the below steps:
  2. Enter an objective title (what you want to achieve that is not quantitative).
  3. Write a description for the objective.
  4. Select the Goal Cycle (the current quarter): The Goal Cycle is the time period that you have to work on these goals. At SLX, our goal cycle will reset each quarter. Your admins will create the goal cycle for you. Make sure to select the current quarter of the year.
  5. Establish a start date.
  6. Establish a due date.
  7. Select owners: This can be a personal goal, owned by one person or, goals can also be owned by groups (more than one person or a team). If creating a goal for your direct team member, they will be the owner.
  8. Select the goal type: The types of goals you see will depend upon the permissions your admin has granted you. Objectives can be achieved by:
    • An individual: these objectives can be created by anyone for work or personal reasons. At this time in 01/2022, team leads will be setting these in Lattice.
    • A team or group: These objectives can be created by anyone for work or personal reasons. Note that group goals do not automatically assign all members of the group as goal owners. Group type and owners are independent. Only goal owners will be notified when a group goal is published and will be responsible for editing and adding progress to the goal.
    • A department: These goals will only be set by Department Directors.
    • The full organization: These goals will only be set by ELT members.
  9. Choose visibility. Objectives can be:
    • Public: Visible to the entire company. An objective will only be set as public by direct leads for their individual team members or for their teams. A public objective will impact the organization’s overall objectives and be publicly trackable with metrics in Lattice. Here’s an example of a public objective set by a direct lead: Increase your account’s overall client satisfaction.
    • Private: Only visible to you, your manager, their managers. A private objective can be set by any team member. Here’s an example of a private objective set by an individual for themselves: Participate more in team huddles.
    • Private to selected departments: Only visible to goal owners and members of the departments selected. Here’s an example of a private to selected departments objective set by a Director: Reduce turnaround time on tasks.
  10. Set a goal priority: Goal priorities will be displayed next to the goal on certain pages throughout the site and also be listed in order of priority (P1 first – P10 last). The level of importance or priority we assign depends on the nature of the objective. It might be beneficial, to keep a number of priorities under three (3). Our suggested levels to use are:
    • P1: Maximum or critical priority. This objective should be tackled first.
    • P2: Important, but moderate priority. These tasks can wait until the top priority (P1) is resolved or is close to being resolved.
    • P3: Important, but lower priority and non-critical. To be tackled only after P1 has been achieved and P2 is close to being achieved.
    • Any task under P3 priority are of lowest priority and non-critical to tackle immediately. Only to be tackled after P1-P3 priorities have been achieved. Lower priority could mean that it’s not pressing at this time, but may become of higher priority later.
  11. Select applicable tags (skip this for now): Tags are optional but help classify and organize goals. Admins create these tags.
  12. Publish or Save Draft.
 
Want more details? Learn more about creating an Objective at Lattice University.

Key Results

Once you have created an objective, you can move on to add Key Results. Remember, key results are quantitative (#, $, %, binary) goals that measure progress to attainment. Key results help measure what you need to accomplish the objective and are usually metrics-driven and tangible.

There are several ways you can add a Key Result:

  1. If you are already in the Goals explorere page and have just created an Objective, click on the objective first, then select “+ Insert key result”. This will tie in your key result to your objective.

2. Or, from your Home page, click on ‘Create goal’. This will open a pop-up ‘Create goal’ page where you can select ‘Key Result’. If creating a Key Result this way, you can align it to a specific objective if you like.

Once you have the Key Results creation page open, follow these steps:

  1. Enter a key result title: This will describe the measurable result.

  2. Write a description for your key result: Select how you will measure the overall progress of the key result. Key results can be measured using the following metrics:
    • Binary: A key result that is definitively complete or incomplete (yes/no)
      i.e.: Grow international accounts
    • Number #: A key result that is measured by a numeric measurement.
      i.e., Hire three new sales representatives
    • Percent %: A key result measured by percentage.
      i.e., Increase revenue by 20%
    • Dollar $: A key result that is clearly defined by currency.
      i.e., Sell $200,000 in subscriptions this quarter
  3. Follow steps 4 through 12 of the objective’s creation process as they will be the same for key results.

Updating goals in Lattice

For now, you won’t need to worry about creating goals in Lattice. Your Team Lead will create the goals within the platform for you. What you can focus on is working on those goals and updating them in Lattice.

Keeping your goal progress updated helps you stay on-track and keeps your team lead up-to-date on what you’ve already accomplished, what you’re currently working towards, or where you may need additional support.

Here’s how it works.

Update/Add Progress to an Objective:

  1. Navigate to the goal that you want to update. There are a few ways you can locate your goals:
    • Home page: You may have a task on your Lattice Home page, reminding you that it is time to update your goals. Click on the task to enter the goal’s detail page.
  • Email: You may have received an email from Lattice reminding you that it’s time to update your goals. Follow the instructions in the email to get to your goal’s page.
  • Goals page: From your Lattice home page, click on “Goals” on the left navigation panel bar. From here, click on the goal you want to update. Then, click on the launch arrow button next to the goal’s name to enter the goal’s detail page.
  • Within the Goal details page, under the Timeline section, add a progress update toward your goal by including a note in the “What’s new?” field and select a status of “Off Track”, “Progressing”, or “On Track” for the parent goal.

    • Off track: You aren’t feeling good about this goal and are far from completing it, or likely not to complete the whole goal. These should be rare.

    • Progressing: You have started working on the goal, but you’re not confident you’ll be able to complete it by the deadline. You may still be able to get this goal back on track. These are more common.

    • On track: You’re feeling great about this goal! It’s moving along, and you are on track to completing the goal by the deadline!
      Learn more about Understanding Goal Progress and Statuses Definition here.

  • You can also see your related key results for that objective below the ‘status’ section.

Update/Add Progress to a Key Result:

Making updates to a key result works exactly the same way. Be sure to update your key results as these determine whether the related objective can be completed.